Avoid Trenching Troubles
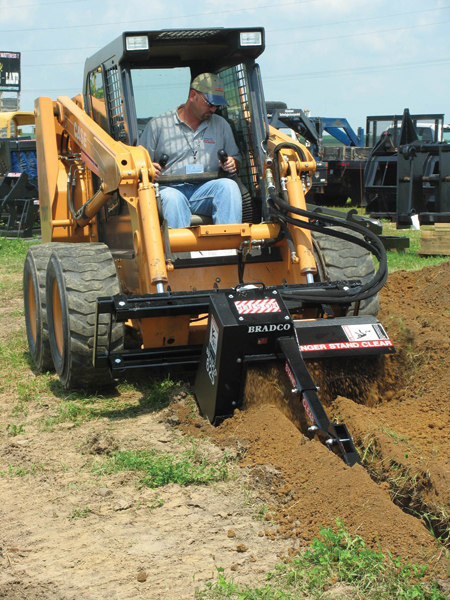
An inexperienced trencher operator can cause costly mistakes, even when using a trencher attachment hooked up to a skid steer or track loader. From start to finish, operators need to educate themselves on the task at hand. Know the digging conditions, recognize potential safety hazards and understand the relationship between the trencher attachment and prime mover. With this knowledge, crews will be able to operate a trencher attachment like pros, saving time and money.
“It’s important to be familiar with and know the controls and adjustments on both your trencher attachment and prime mover,” says Dave Aldrich, light construction dealer development and service manager for Paladin, which includes Bradco trencher attachments. “Take time to learn how they operate now. Such knowledge is crucial for safe, efficient operation of your equipment.”
Before You Begin
Inspect your jobsite and take notice of any potential hazards in the area. Trenching through a hidden utility line could cause electrocution and death. Call all utility companies and have them plot out all of their lines before operating any trencher attachments or dial 811 before you dig. Prior to starting a trench, it is always a good idea to plan out the job. Several variables need to be taken into account before trenching:
1. Trench requirements
2. Potential safety hazards
3. Digging conditions
4. Trencher tooth pattern
5. Digging chain tension
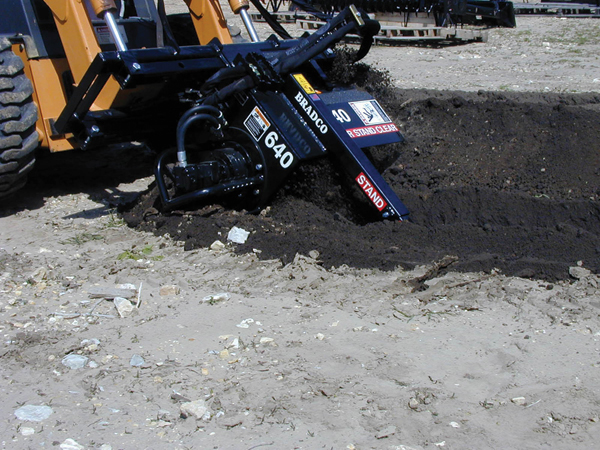
Before a trencher touches the dirt, match the tooth type and pattern with the soil type. Talk with a dealer or manufacturer representative about the soil type, too. Then choose the proper teeth for the application:
1. Cup — The most common teeth chosen for trencher attachments. Ideal for good digging applications like black dirt, loam, moist clay, sand and sandy clay.
2. Shark — Ideal for rocky, abrasive or compact conditions like caliche.
3. Frost — Ideal for the most extreme trenching applications like coral, frozen ground and fracturable rock.
In order for a trencher attachment to be successful in these applications, owners and operators will have to take into account the prime mover’s hydraulic horsepower capabilities and overall depth of the trenching. Trencher attachments do have their limitations, so match not only the trencher teeth to the digging conditions, but also the machine’s hydraulic capabilities and the trench depth.
When trenching, it is important to have the trencher chain properly adjusted. You do not want the chain too loose or too tight depending on the style of boom and tensioning system being used. Follow the manufacturer’s instructions in the operator’s manual for proper adjustment. Also, never work on or make adjustments to any part of your trencher attachment while the unit is running. You could get caught in the chain or digging teeth, which could cause severe injury or death.
Starting and Stopping the Trencher
Power is supplied to most trencher attachments by the prime mover’s auxiliary hydraulic system. In this case, the trencher itself does not have an on/off switch, but is operated by the prime mover’s auxiliary hydraulic control mechanism. To start the trencher, engage the auxiliary hydraulics. To stop the trencher, disengage. Trencher speed and power are determined by the flow coming out of the auxiliary system, which is dependent on the prime mover’s engine speed. To increase trencher speed, increase the prime mover’s engine speed. To slow down the trencher, decrease the prime mover’s engine speed.
Time to Trench
When first starting a trench, set the prime mover’s engine to half throttle. This will reduce the shock to the prime mover and trencher attachment when the digging teeth first contact the ground. Position your prime mover with the trencher boom directly over the center of where you will dig the trench. It will take about 4 ft of trenching before the trencher will be able to operate at the desired depth, so plan for this and position the trencher about 4 ft behind where you want the actual trench to start. Once the trench is started, set the engine back to full throttle.
Slowly lower the trencher arm into the ground to start the trench by lowering the trencher attachment with the loader arms and loader bucket controls. Carefully creep backwards as you roll the trencher boom down into the soil with the bucket and lift arms of the loader. Watch the crumber end so it does not get caught up on the trencher and continue to creep backwards. Once you have reached the required depth, contractors should be at a 60- to 65-degree angle with the trencher boom. A 48-in. boom will give operators 48 in. of digging depth at a 65-degree angle.
Make sure you look behind you before reversing your prime mover to trench. Be aware of any person or obstruction in its path and observe any terrain changes such as drop-offs or soft ground. When trenching, remember to keep the discharge auger running about an inch off the ground; typically the skid shoe on the right-hand side of the machine will keep the auger at that height. This will keep the dirt pushed back away from the edge of the trench to help eliminate the spoil from falling back into the trench and prevent cave-ins.
Avoid a Wrong Turn
Turning the prime mover is easy. Add a trencher attachment to the mix and operators will have to be a little more cautious. Avoid making turns with the trencher attachment. A gradual turn or radius can be done, but it will put side loads on the trencher boom, causing excessive chain wear and possible damage to the boom and trencher assembly. Turning too tightly while trenching will cause the trencher boom to bend and jam in the trench and stall, leading to excessive oil temperatures. Be cautious at all times when turning. To make sharp turns and 90-degree angles operators will need to dig two trenches.
Completing Your Trench
Once you’ve dug the trench, remember that the trencher boom is at an angle and that it must continue trenching until the end of the boom has dug past the proposed end of the trench. Once the end of the trench has been dug, keep the trencher running and raise the loader arms to lift the unit clear of the trench. When the trencher has cleared the trench, disengage the auxiliary hydraulics to stop the trencher and then drive the prime mover away from the trench. Keep equipment away from the trench after it has been dug so the weight of the unit does not cause a cave-in.
“Remember, your trencher attachment’s performance is directly related to the power available from your prime mover’s auxiliary hydraulic system,” says Aldrich. “If the trencher seems to lack power or speed, it may be due to a lack of sufficient auxiliary power. Be sure to match the size of your trencher attachment with the hydraulic capabilities of your machine.”
Trencher performance is also related to how well it is maintained, digging tooth wear and type and size of digging chain, crumber boom and shoe used. Consult the operator’s manual for maintenance tips or ask a local dealer. At the end of the day, taking the time to operate and maintain a trencher attachment correctly will save contractors time on the job and put money back in their pockets.
John Thomas is the vice president of marketing and business development for Paladin, which includes Bradco Trencher Attachments, based in Dexter, Mich.