Attachment Insights
Unwated Stumps
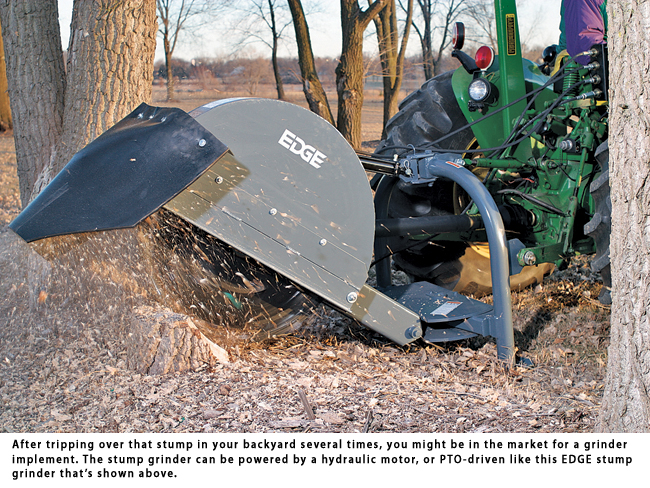
PTO-Powered Grinders Make Sharp Work of Wooden Leftovers
Tree stumps can not only be an eyesore on a nicely landscaped property, but they can also be a challenging project to remove without the proper tools. Hobby farmers, landowners, arborists and landscapers can all make productive use of a stump grinder implement, especially hooked up to a do-everything compact tractor.
Using this PTO-driven, rear-mounted stump grinder is easy. Simply back into place, lower the stand to set the stump grinder down and let the stump grinder mill the stump into small wood chips. The ¾-in. thick cutting wheel is equipped with carbine-steel teeth and is driven by a heavy-duty oil bath gear box. The lift and swing cylinders are controlled from the tractor seat and the 55-degree swing path can handle stumps up to 45 in. in diameter and 24 in. tall without repositioning the tractor.
Two sets of rear hydraulic remotes on the tractor are needed for the lift and swing capability. The cutting wheel rotates when engaging the PTO and a simple lever in the tractor activates the hydraulic angle cylinder, which swings the wheel left to right. A stump can be ground 10 to 12 in. below ground and the remaining root system can be left, without leaving a large hole to fill. This area can then be raked with topsoil and seeded. Buying the right stump grinder attachment depends on the size of the tractor and its horsepower. The tractor must have two rear hydraulic remotes to operate the lift and swing capabilities, and a 540-rpm PTO drive shaft.
Most stump grinders come in 24- and 34-in. cutting wheel diameters and come standard with hoses and depth gauge. The 24-in. stump grinder often has 23 teeth and can mill down to 10 in. below ground. This size stump grinder can be used on a tractor with 15 to 35 hp and a Category 1 three-point hitch. A 34-in. stump grinder usually has 25 teeth and chips down to 12 in. below ground. This model requires 35 to 100 hp and a Category 2 three-point hitch. Suggested list prices range from $5,000 to $6,500.
When cutting a stump, the sweep path of the attachment varies from one stump grinder to the next. This is quite possibly the most important difference in the operation of one stump grinder attachment from another. Some have cutting teeth on both sides of the cutting wheel, while others only have teeth on one side. What this means is that with stump grinders that have teeth on both sides, you will be able to cut the stump while swinging the cutting head in both directions. If there are only teeth on one side of the wheel, the stump grinder will only cut swinging in one direction. This will make a difference in productivity; but if there are only teeth on one side of the wheel, it could also mean a big difference in maintenance costs if the operator decides to cut in the wrong direction. These maintenance costs could be in the form needing to replace the cutting wheel, instead of just the cutting teeth. There is usually a large decal, visible to the operator, telling him or her which direction to move the cutting head if, in fact, it will make a difference. Please follow all directions in the operator’s manual and posted decals to prevent unnecessary maintenance costs.
The kind of stump being cut will make a big difference in the grinder’s operation. Properly operating the grinder based on the stump species will get maximum performance and minimal stalling. For instance, a soft wood such as pine could be cut in increments of about 1.5- to 2-in. passes. A hardwood like an oak should be cut in smaller increments — 1 to 1.5 in. — to prevent stalling of the attachment and excessive wear on the cutting teeth and wheel.
Optimum performance of your stump grinder can be accomplished with simple routine maintenance. Teeth should be inspected daily or before each use and any broken or damaged teeth should be replaced. Grease points should be lubricated every eight hours of use and the oil in the gear box should be checked approximately two times a year, depending on the usage.
PTO-powered stump grinders are valuable tools for contractors and private users to purchase, but these implements also rate as one of the more popular attachments for rental companies.
Renee Bernardy is the marketing coordinator for EDGE Attachments, offered by CEAttachments Inc., based in West Bend, Wis.
Dirt Drills
Tractor Augers Bore Through Tough Ground for All Types of Applications
By Doug Zoerb
Ever need to punch a few holes in the earth? Well then a PTO-powered auger implement is probably something you need. Whether it’s dozens of holes or just one, auger attachments can save time, effort and money when it comes to placing precise holes in lawns, on the farm or beneath the construction site. Commonly called posthole diggers, auger implements are used extensively by landscape contractors, fencing contractors, building and grounds staff, golf course maintenance crews, farmers and ranchers.
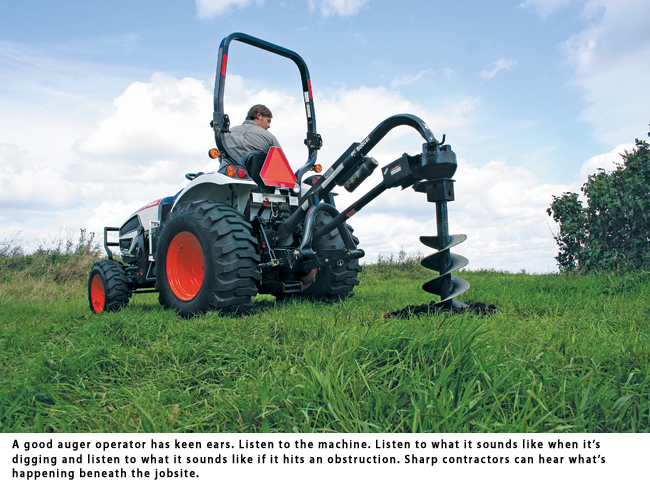
A typical PTO auger implement requires a tractor with a Category 1 three-point hitch and a 540-rpm PTO. Various size bits are available, typically ranging from 6 to 24 in. or more in diameter. Bits above 12 in. in diameter are generally used for landscaping work.
“Landscapers will use bigger bits to dig holes for small trees or saplings,” says Chris Knipfer, segment application marketing manager at Bobcat Co. in West Fargo, N.D. “The 6- to 12-in. bits are the most common sizes sold, followed by the very largest bits for landscape work.” Knipfer also notes these are serious tools, so operators using tractors (oftentimes novice users) need to take it easy when using an auger attachment.
“The biggest mistake is forcing the bit down too fast and not letting it cut,” he says. “Take it easy when drilling. The teeth on the auger are rugged, but they can break. Don’t be too aggressive.”
Knipfer suggests that when the flutes on the auger bit fill up, remove the bit from the hole, clean the bit and then return the bit to the hole again. A large rock or root can potentially stall the auger, he says, but with patience, the auger may be able to drill through a root or move a smaller rock aside. When positioning the bit before digging, Knipfer suggests keeping the tractor at a low rpm and low drive in order to minimize the bit swinging back and forth.
“If you have a lot of holes to drill, you will save time by moving more slowly to keep the bit from swinging excessively,” he says. “It will also save time if you have a spotter who can tell you if the bit is straight or not while you’re digging.”
As with all PTO implements, Knipfer advises that helpers or bystanders keep a safe distance from the rotating PTO shaft. In addition, he said, bystanders should keep away from the rotating bit while it is turning. When making a buy or rent decision, Knipfer says users tend to buy the bits they use most often. Typically, this is a 6- or 12-in. bit. Landscapers tend to buy larger bits, which they use frequently, while farmers, ranchers and homeowners will rent a larger bit as required.
The most important pre-selection step is to understand what the tool will need to do and how often it will need to do it. Depending on the ground conditions and hole diameter, purpose and depth, different auger attachment types are available. From fence posts and tree and shrub planting to poles and piers, augers pop holes in the ground neatly and precisely. With the proper understanding of auger attachment capabilities and the demands of a particular project, matching tool and task is a snap.
Doug Zoerb is a technical writer for Two Rivers Marketing, based in Des Moines, Iowa.
Brooms & Backhoes
Two Heavy-Duty Implements for Commercial Tractor Operations
Compiled by CE Staff
Clean Sweep
A sweeper implement is a great choice for clearing leaves and snow, as well as every other mop up job — from caked-on dirt to grass clippings. Most broom attachments for compact tractors are categorized by width (from 48 to 84 in.), the way they attach (rear or front) and the style of sweep (angle or push). Many brooms today are offered as front-mounted.
Manufacturers typically offer similar hydraulic powered brooms, but most tractors would need a PTO-driven hydraulic pump to operate these brooms. If a tractor has a universal mount on the loader and around 10 or 12 gpm of hydraulic flow, a hydraulic powered broom can usually be run from the front of the tractor. Other options are available for the tractor and are usually powered from the rear PTO. There are also push brooms available for the rear of the tractor; this is a static-mounted broom that does not require PTO connection, but can be angled with a hydraulic cylinder if hydraulics are available. Push brooms can be very efficient and cost-effective for light sweeping jobs, but angle brooms are most common.
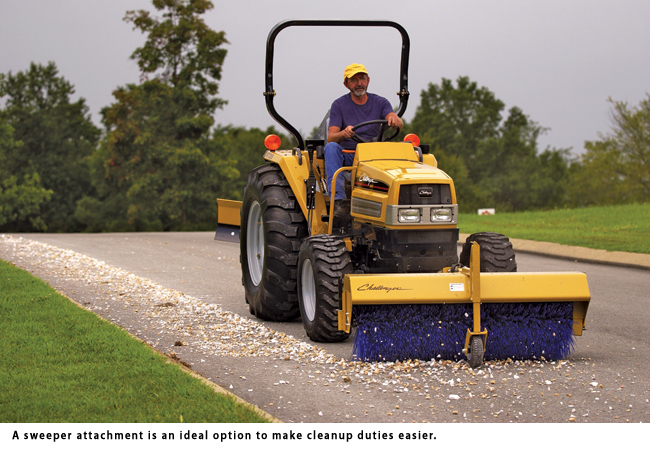
When choosing a broom for your compact tractor, you want to make sure the width of the broom at full angle is greater than the width of the tractor and the PTO horsepower of the tractor is able run the broom. Most brooms can be equipped with poly material or a mixture of wire and poly bristles. The added wire will reduce the amount of wear. In contrast, the all poly broom will be better for more delicate surfaces. Pricing depends on the type and size of broom. Angle brooms commonly cost from $3,700 to $4,000, while push brooms typically cost from $1,900 to $2,300. In either configuration, larger models are available from many manufacturers and can cost in the $7,000 range.
Brand New Digs
When it comes to landscape, farming, small construction and even homeowner excavation projects, a backhoe attachment can be a smart and solid investment. It’s also a major purchase, so it’s important to take the time to evaluate your needs and expectations by determining a few important factors such as what you need your backhoe to do today and what you will need it to do in the future.
The backhoe attachment is the ideal match to the front-end loader on a compact tractor (making the well-known loader backhoe). With a backhoe on board, the tractor owner unleashes the full digging power up to a 10-ft dig depth (depending on model) and bucket sizes ranging from 9 to 36 in. Some manufacturers use a removable full sub-frame design, while others offer a four-point mount system. The sub-frame design requires you to remove the entire sub-frame, while a four-point mount system requires the removal of just the backhoe; the sub-frame also consumes a large amount of storage space.
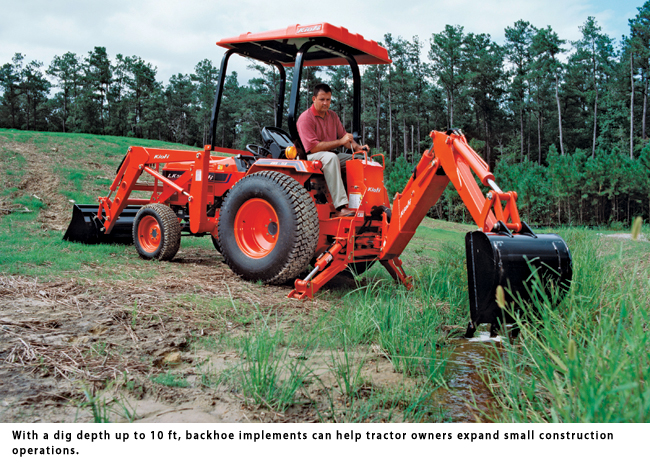
Some manufacturers use a straight boom assembly while others offer a curved boom. The difference between the two is that curved booms provide improved visibility and easier truck loading and straight booms utilize less welded plates to gain strength and tend to be less expensive machines. The curved boom craze began when backhoes started to mirror the design of hydraulic excavators that employ a curved design for added visibility beneath their booms. However, a TLB with a 10-ft dig depth isn’t going to be moving mountains, so the curved vs. straight boom argument comes down to a matter of philosophy and personal opinion. It’s important to have a solid idea of the dig depth and bucket size needed before contacting the dealer to get the right fit the first time. A typical backhoe attachment will run between $3,500 and $8,000, but the enhanced utility of the tractor returns the investment pretty quickly.


Comments are closed here.