A Step-by-Step Guide to Replacing the Final Drive Motor on a Mini Excavator

Choosing the right final drive motor for your compact excavator and replacing it can be a crucial task that requires careful consideration. The final drive motor is responsible for providing the hydraulic power that drives the tracks and moves the excavator, so it is important to select a motor that will meet the demands of your work and provide reliable performance. When choosing a final drive motor, you have three options to choose from: genuine, OEM (Original Equipment Manufacturer), and aftermarket. Each option has its own pros and cons, and it is important to understand these to make the best decision for your needs.
Genuine Motors: These are manufactured by the original equipment manufacturer and are designed to meet their specific specifications and standards. The benefits of genuine motors include guaranteed quality, reliability, and a direct replacement fit. However, the cost is often higher than other options, and there may be limited availability.
OEM Motors: These are manufactured by third-party companies to meet the specifications of the original equipment manufacturer, but are not manufactured by the original equipment manufacturer. The benefits of OEM motors include a lower cost than genuine motors, and the option to choose from a variety of manufacturers. However, the quality and reliability of these motors may vary.
Aftermarket Motors: These are manufactured by third-party companies, but are not necessarily required to meet the specifications such as speed and torque setting of the original equipment manufacturer. The benefits of aftermarket motors include significantly lower cost than genuine or OEM motors, and the option to choose from a variety of manufacturers. In some case, aftermarket final drives are 5 times cheaper than genuine products making them very attractive choice. However, the quality and reliability of these motors may also vary.

Aftermarket final drive motors are often the best option for those looking for a cost-effective solution that offers reliable performance. Replacing a final drive motor is not a complicated process, and anyone with basic tools and knowledge can replace their final drive motor. In fact, here is a step-by-step guide to help you replace the final drive motor on your excavator:
- Prepare your workspace: Make sure you have a clean and level work area with good lighting and enough room to move around the excavator.
- Gather your tools: You will need a socket set, torque wrench, hydraulic jack, hydraulic hoses, and fittings.
- Remove the hydraulic hoses: Before you start working on the final drive motor, you need to disconnect the hydraulic hoses from the motor. This can be done by using a socket set to remove the fittings and hose clamps.
- Support the excavator: Use a hydraulic jack or the arm of the excavator to give a tilt to one side of the undercarriage and remove any load from the final drive motor.
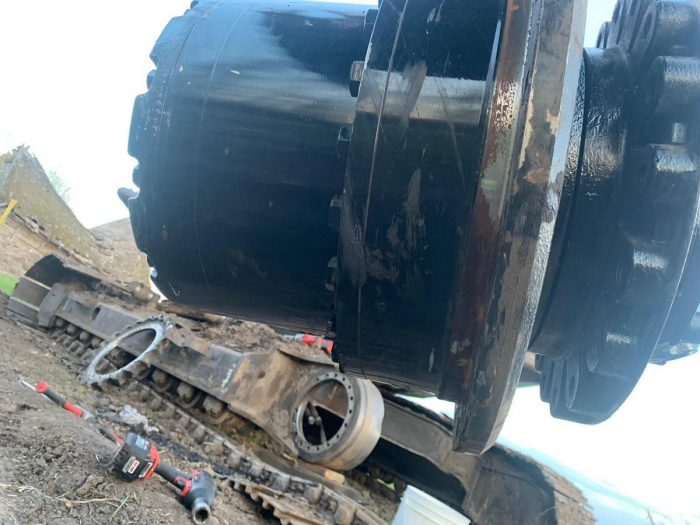
- Remove the motor: Once the hoses are disconnected, you can remove the final drive motor from the excavator. This usually requires removing bolts and brackets, which can be done using a socket set.
- Install the new motor: Once the old motor has been removed, you can install the new final drive motor in its place. Make sure to tighten all bolts and brackets to the manufacturer’s specifications.
- Connect the hydraulic hoses: Reattach the hydraulic hoses to the new final drive motor and make sure they are tightened securely.
- Test the motor: After reassembling the excavator, start the engine and test the new final drive motor. Check for leaks, proper hydraulic pressure, and smooth operation.
- Clean up: Clean up your workspace, making sure to properly dispose of any hydraulic fluid or other debris.
Tips and Advice
- Always follow the manufacturer’s instructions and specifications when replacing the final drive motor.
- Seek the assistance of a professional if you are not confident in your abilities
- Make sure to inspect the hydraulic hoses and fittings before installation, as they can become damaged during removal. Replace them if necessary.
- Use a torque wrench to tighten bolts and brackets to the manufacturer’s specifications to ensure a secure fit and prevent any damage to the final drive motor.
- Keep a clean and well-lit workspace to reduce the risk of accidents and make the process easier.
In conclusion, replacing the final drive motor on your excavator is a relatively simple process that can be accomplished with basic tools and knowledge. By following the steps outlined above and seeking professional assistance if needed, you can ensure that your excavator is equipped with a reliable and efficient final drive motor. When choosing a final drive motor, consider your needs and budget, and choose an aftermarket motor for the best value for your money.
This article was provided by Hydraulic America. Visit them right over here.
Mini excavators are making big waves on jobsites all over North America. Click here for the latest news on these machines and the companies that make them.