The Latest Advances and Common Pitfalls of the Hand-Held Hammer Market
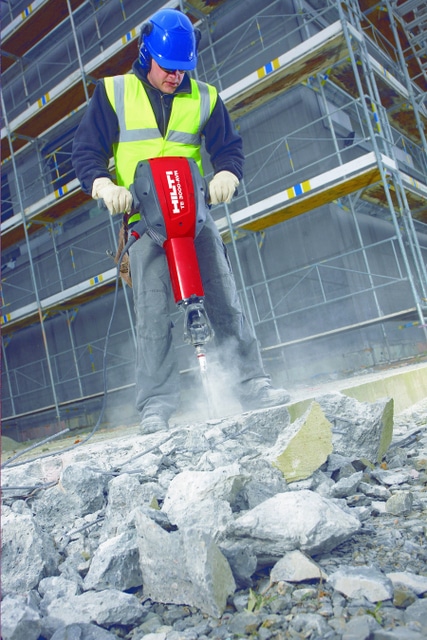
It doesn’t get much more extreme than hammers and breakers: steel on steel components impacting concrete thousands of times per minute with each impact ripping into the base material but also affecting the tool and the operator. In this article, we’ll cover things to keep in mind throughout the life cycle of the tool, from selection to maintenance to consumables.
What’s the Right Size?
The right size of hammer/breaker for each contractor is ultimately going to be decided by the thickness of the concrete (or other base material) they’re working with and where that work will be performed. Is it at ground level? Is it at waist level or above? Those factors will help a contractor gauge the size and style of the hammer/breaker they need.
What’s the Proper Handle Configuration?
The direction the operator will be working in (downward to the floor, perpendicular to the wall or somewhere in between) is key in selecting a hammer/breaker. There are three general handle configurations to consider when selecting a hammer/breaker: T-handle, inline or D-handle. The right solution for each application depends on where the work is taking place and how the tool will be positioned. T-handle breakers are generally larger and heavier and are intended to work perpendicular to the base material. These are similar to what we think of as a traditional jackhammer working straight down with a handle positioned on either side of the tool.
The inline handle design features a closed-loop T-handle on the backside, intended for orientations downward to about 15 degrees from perpendicular, to allow for angled breaking. Both the T-handle and inline options are generally more ideal for hammering that takes place at or near ground level and below the waist of the operator. The third design, the D-handle, provides more of an L-shape design and is intended to break surfaces such as walls and ceilings that require the tool to be held/positioned at or above the waist. Whatever style a contractor chooses will largely be determined by weight, balance and the location and thickness of material they work in.
Dedicated Hammer/Breaker or Combihammer?
If you’re regularly drilling holes, a combihammer is a great tool — it gives you the dual functionality of a breaker and a hammer-drill in a single solution. However, if a contractor is using the hammer function more than 50 percent of the time, or if the concrete is greater than 4 in. thick, we recommend investing in a dedicated hammer/breaker.
Advantages of Brushless
Hammers/breakers with brushless motors offer significant advantages in terms of long-term productivity and the life of the product. Breaking concrete generally creates a significant amount of dust. That dust is very abrasive and can get inside the tool. It coats the inside of tools with traditional copper windings, and the friction of the spinning motor and the dust can create significant wear to the epoxy that covers the winding and the brushes/rotor. This eventually burns up the motor and results in downtime and costly replacement. This condition is generally avoided with brushless motors.
Going Cordless
Cordless combihammers provide a wealth of benefits and, in some cases, are more productive than their corded counterparts. Cordless tools eliminate the need for an extension cord, which is an added expense and causes clutter on the jobsite. They eliminate the need to locate or bring a power source, and no one is tethered to a power source — any worker can go to any location and do the job. The only limitation of a cordless combihammer occurs on larger diameter holes and on thicker base materials. Some cordless combihammers will drill a 1-in. hole, but not as fast as a corded model. If it’s working on a 3/4-in. hole, a good cordless model will keep pace with the corded model. If a contractor is performing “serial drilling or hammering,” where it all takes place in a single location and power is readily available, a corded model may be more practical and productive. If the application is more varied and widespread around a jobsite, the cordless model may prove most efficient.
To Rent or Own
As with any tool, the decision of renting versus owning comes down to utilization. If a contractor is only going to use the tool a few times a year for niche work, then it’s more practical to spend $35 to $75 per day renting that tool, based on size. If the tool is going to be used regularly and having it on-hand outweighs the hassle of renting, then it makes more sense to make the investment. Renting is also a great way to test tools before you make the decision to buy.
Not all Chisels are Created Equal
Ten years ago, a chisel was just a piece of steel with a point or flat tip on the front that went into the tool. Chisels have evolved in design and functionality to provide longer life and greater functionality. Whether it’s as simple as a polygon shape or grooves built into the tip, some of today’s newer chisels are designed to allow dust to escape the work area to improve productivity, reduce the instances of a chisel getting stuck in the work piece and maintain performance over the life of the chisel.
Vibration Reduction
Operating a high impact tool such as a hammer or breaker can be exhausting. Look for a model that features vibration reduction technology. Vibration reduction is achieved with varying effectiveness using different methods based on make and model, but all are intended to accomplish the same thing: Vibration is dampened so the operator does not feel as much impact from each movement of the tool, making them more comfortable and more productive. The days of teeth chattering and head jarring are behind us.
Other Considerations and Best Practices
• Contractors who try to use too small of a breaker with the wrong handle design on thicker base materials — instead of renting or purchasing the proper tool designed for working with those thicker materials — will become frustrated with the ineffectiveness of the tool they are using.
• When buying a hammer/breaker, always think ahead to future jobs. A contractor may only have one job to complete right now and may buy a product that does the trick for that day, but that does them no good for future jobs where they may run into thicker material. The more utilization a contractor gets out of each product, the lower that product’s total lifetime cost of ownership will be.
• Pay attention to the warranty. Some hammer/breaker manufacturers cover wear and tear. Others do not. Contractors who work in heavy-duty applications may feel burned when they find out their warranty doesn’t cover wear and tear.
• When putting a new insert or chisel into the tool, always put a bit of lithium grease on the tip of the end that goes into the tool. This keeps the entire chuck greased — critical as the tool features a lot of steel-on-steel friction in a high-impact application.
• If you’re working in a heavy-duty environment, look for a breaker with a detachable cord (some manufacturers even provide a second cord with the purchase of the hammer/breaker). If a contractor damaged the cord in the past, either by cutting through it or dropping concrete on it, the whole unit needed to be returned and repaired. Now, if a contractor damages a cord, they can simply detach it, use the second cord and return the damaged cord for replacement, helping prevent downtime and keeping operators productive.
Aaron Brading is the business unit manager for power tools and accessories at Hilti North America.


Comments are closed here.